សូមស្វាគមន៍ចំពោះការចូលមកទស្សនា​(Welcome to Visit my blog) បើចង់អោយកូនខ្មែរចេះសូមមេត្ដាជួយចែករំលែកចំណេះដឹង

Tuesday, January 19, 2016

១១ ចំណុច​រៀន​​អនុវត្ត​ដោយ​ខ្លួន​ឯងដើម្បី​ឲ្យ​កុំព្យូទ័រ​​ដើរ​លឿន​ជាង​មុន

1 comments
     ការ​ប្រើប្រាស់​កុំព្យូទ័រ​រាល់​ថ្ងៃប្រាកដ​ជា​មាន​ឯកសារ​ច្រើនដែល​ត្រូវ​រក្សា​ទុក ជា​ហេតុ​ធ្វើ​ឲ្យ​កុំព្យូទ័រដំណើរការ​យឺតដូច្នេះ​ដើម្បី​ឲ្យ​វា​ដំណើរការ​លឿន​ជាង​មុន អ្នក​ជំនាញ​បាន​ណែនាំ​គន្លឹះ​មួយ​ចំនួន​ដើម្បី​ប្រិយមិត្ត​អាច​រៀន​អនុវត្ត​​​យ៉ា​ង​មាន​ប្រសិទ្ធភាព។
១) ជៀស​វាង​ដាក់​ឯកសារ​លើ Desktop

ការ​ដែល​យើង​ដាក់​ឯកសារ​ច្រើន​ពេក​លើ Desktop ធ្វើ​ឲ្យ​ពេញ Drive C ដោយ​មិន​ដឹង​ខ្លួន ដូច​នេះ កាល​ណា​យើង​ដាក់​វា​រហូត​ពេញ ឬ​ជិត​ពេញ វា​ធ្វើ​ឲ្យ RAM (Random Access Memory) ដែល​មាន​នាទី​ដំណើរការ​ទិន្នន័យ​ជា​បណ្ដោះ​អាសន្ន នោះ​អស់​កន្លែង​ដំណើរការ ឬ រក្សា​ទុក​ទិន្នន័យ​ជា​ហេតុ​ធ្វើ​ឲ្យ​ម៉ាស៊ីន​​កុំព្យូទ័រ​​របស់​យើង​យឺត​ជាង​ធម្មតា ប្រសិន​បើ​ឯកសារ​​មាន​ទំហំ​ធំ។

២) លុប​ឯកសារ ​បណ្ដោះ​អាសន្ន
 ​ចុច Window + R វាយ​ពាក្យ %temp% ឬ “%tmp%” ឬ​ក៏ “temp” ចុច​ប៊ូតុង Enter រួចSelect file ទាំងអស់​ហើយ​លុប​វា​ចោល។

 ៣) អនុវត្តDisk Cleanup
 ដោយ​ចុច​ប៊ូតុង Window + R  វាយ​ពាក្យ “cleanmgr” រួច​​ជ្រើស​រើស Drive ណាមួយ​ដើម្បី​ធ្វើការ​សម្អាត។

 ៤)  អនុវត្ត​សម្អាត Disk Defragmenter
 ព្រោះ​នៅ​ពេល​យើង​បើក​កម្មវិធី​ច្រើន ក្នុង​ពេល​តែ​មួយ​វា​ក៏​អាច​ធ្វើ​អោយ​កុំព្យូទ័រ​យឺត​ផង​ដែរ ដូច​នេះ​ដើម្បី​ជៀសវាង​យើង​គ្រាន់​តែ​ចុច Window វាយ​ពាក្យ disk នោះ​វា​និង​សម្អាត Drive។

 ៥) លុប​ទិន្នន័យ​ចាស់​ៗ​ពី Prefetch Windows
 ដោយ​ចុច Window + R វាយ​ពាក្យ prefetch ដើម្បី​លុប File ណា​ដែល​គ្មាន​ប្រយោជន៍​ចោល​ទាំង​អស់។

 ៦) បិទ Start up កម្មវិធី
 ដោយ​ចុច Window + R វាយ​ពាក្យ msconfig រួច​បិទ​កម្មវិធី​ណា​ដែល​យើង​គិត​ថា​ចាំបាច់ ឬ​មិន​ប្រើ។
៧) លុប​កម្មវិធី​ដែល​មិន​ប្រើប្រាស់
 ដោយ​ចុច Window + R រួច​វាយ​ពាក្យ “appwiz.cpl”  ឬ ចុច Window រួច​ស្វែង​រក Control Panel  រួច​ធ្វើការ​លុប​កម្មវិធី​ដែល​មិន​ប្រើ​ជា​ការ​ស្រេច។

 ៨) ធ្វើការ​សំអាត Registry
 ប្រើប្រាស់ Registry Clean Up Tool ដើម្បី​ធ្វើ​ការ Clean វា។

 ៩) លុប Extension ដែល​មិន​ចាំ​បាច់​នៅ​លើ Browser
 ការ​ដែល​យើង​ដាក់ Extension ច្រើន​ពេក​នៅ​លើ Browser ក៏​បណ្ដាល​ឲ្យ​កុំព្យូទ័រ​ដើរ​យឺត​ផង​ដែរ។
នៅ​លើ​កម្មវិធី Chromeចូល​ទៅ​កាន់ Settingជ្រើស​យក Extension  រួច Remove វា​ចោល។
នៅ​លើ​កម្មវិធី Firefox ចូល​ទៅ​កាន់ Add on ជ្រើស​យក Extension រួច Remove វា​ចោល។

 ១០)  Update Driver
 ​ការ​ដែល​យើង​ Update ព្រោះ Driver នីមួយៗ​អាច​ផុត​កំណត់ ឬ​ជំនាន់​ចាស់​ដែល​បណ្ដាល​ឲ្យ​ការ​ប្រើប្រាស់​មិន​មាន​ភាព​រលូន ដូច​នេះ​ដើម្បី​រក Driver ណា​មួយ​ដែល​យើង​ចង់ Update គ្រាន់​តែ​ចុច Window + R រួច​វាយ​ពាក្យ “devmgmt.msc” ចុច Enterនោះ​វា​នឹង​បង្ហាញ​ផ្ទាំង Device managerហើយ​ចុច​លើ​ Driver រួច Mouse ស្កាំ​ហើយ​ចុច Update Driver រួច​ជ្រើស​រើស Searching Automatically។

 ១១) Full Scan Virus
 ​អ្នក​ត្រូវ Scan Virus នៅ​ក្នុង​កុំព្យូទ័រ​របស់​អ្នក​ព្រោះ Virus រឺ Malware ក៏​អាច​ធ្វើ​អោយ​កុំព្យូទ័រ​ដំណើរការ​យឺត​ផង​ដែរ។
 លោក​បាន​បញ្ជាក់​បន្ថែម​ថា មិន​មែន​គ្រប់​កុំព្យូទ័រ​ទាំង​អស់​សុទ្ធ​តែ​ដើរ​យឺត​នោះ​ ប៉ុន្តែ​ប្រសិន​បើ​ប្រិយមិត្ត​ជួប​បញ្ហា​ដូច​នេះ​អាច​សាកល្បង​ដោយ​ខ្លួន​ឯង​បាន ហើយ​គន្លឹះ​ទាំង​នេះក៏​​មិន​អាច​ឲ្យ​កុំព្យូទ័រ​ដំណើរការ​លឿន​រហូត​នោះ​ដែរ។

Sunday, January 17, 2016

[ROM] Galaxy Note II N7100 4.4.2 Style S5 V2 1 file by odin

0 comments
សម្រាប់ បុកទូរស័ព្ទកូរេ Galaxy Note II N7100 មានខ្មែរស្រាប់ និង Keyboard
ជំហានទី១ យើងត្រូវប្រើកម្មវី Odin ដើម្បីបុកប្រូកាមទូរស័ព្ទ
ជំហានទី២ យើងត្រូវមាន Source Android for Galaxy Note II N7100 Ex, Android 4.4.2
 (បន្ទាប់ពីទាញយករួចហើយលោកអ្នកត្រូវ Extract file ទើបអាច បុកប្រូក្រាម ទូរស័ព្ទបាន។
 Password : kppsn7100

Thursday, January 14, 2016

របៀបបុកប្រូក្រាម Samsung galaxy Note II (Korean SHV-250L)

0 comments


មានអក្សរខ្មែរស្រាប់មិនបាច់ដំឡើង Font Khmer 
Password: E250LS6$$$333
បន្ទាប់ពីទាយករួចហើយសូម Extract File ទើបអាចប្រើបាន សូមអរគុណ

Tuesday, December 29, 2015

Add-hibernate-to-the-start-menu-in-windows-10

0 comments

In Windows 10, it is possible to add the Hibernate option to the power button menu inside the Start menu. Using that command, you can easily use hibernation instead of the shutdown command and your PC will still be powered off. The hibernation mode in Windows is very useful and time-saving as you don't have to close your open documents and apps before powering off the system. You can resume your work the next time exactly where you stopped. Here is how to add the Hibernate command to Start Menu in Windows 10.

If your Start menu in Windows 10 does not contain the Hibernate option, you need to do the following:
  1. Open Control Panel
  2. Go to the following item:
    Hardware and Sound\Power Options
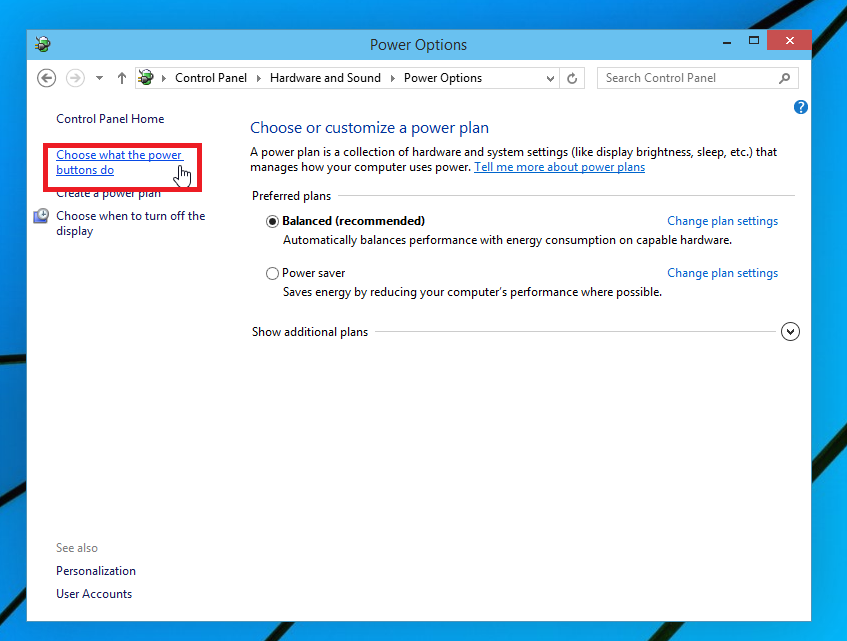
  3. On the left, click "Choose what the power buttons do":
    change what the power options do Windows 10
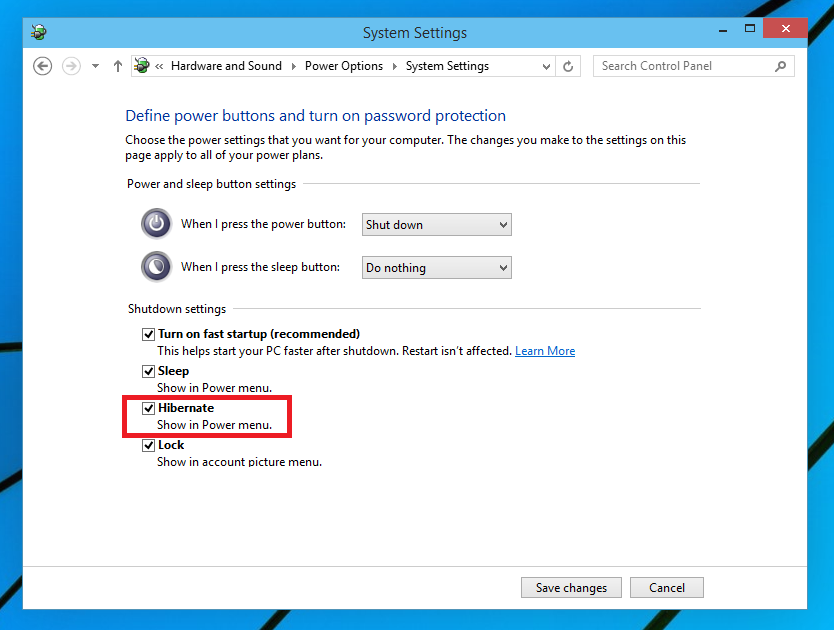
  4. Click the Change Settings that are currently unavailable link. The Shutdown options will become editable. Check the option there called Hibernate (Show in Power menu).
    add hibernation start menu Windows 10
    You are done.
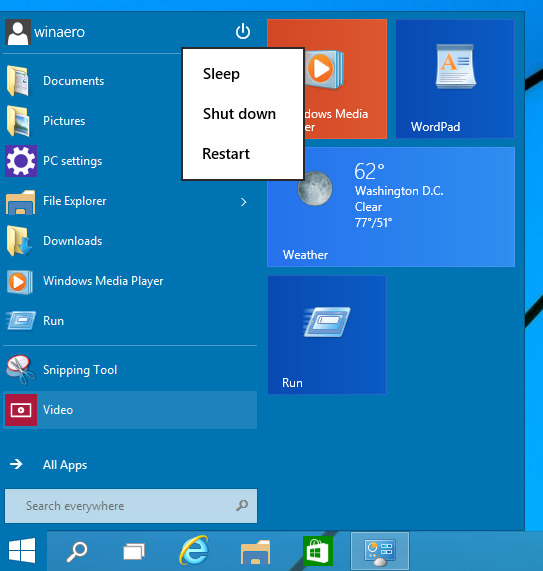
Before:
start menu windows 10
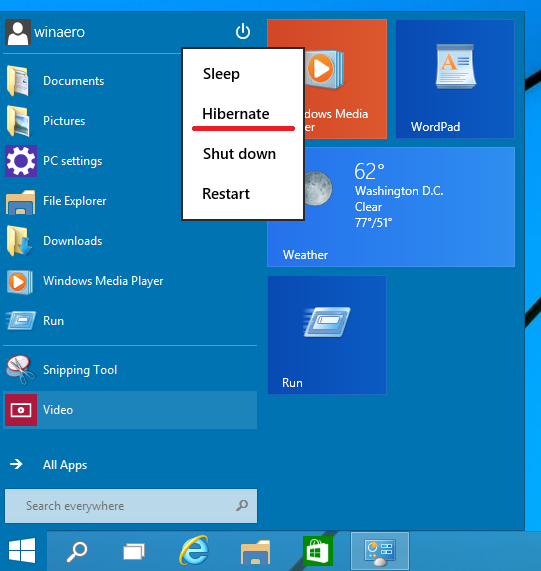
After:
start menu with hibernate windows 10
To hide the Hibernate option from the Shutdown menu of the Start Menu on Windows 10, just untick that checkbox.

Sunday, October 25, 2015

កែប្រែឯកសារ PDF ជាមួយ Foxit Advanced PDF Editor 3

0 comments

កម្មវិធី Foxit Advanced PDF Editor 3​ ដែលមានមុខងារយ៉ាងសំខាន់ក្នុងការកែប្រែឯកសារ PDF បានយ៉ាងងាយបំផុត ដែលពីមុនមកនៅពេលដែលអ្នកបំលែងពីឯកសារ Word or Excel ទៅជា ប្រភេទ PDF នោះលោកអ្នកមិនអាចកែប្រែ PDF បានឡើយ។ ឥឡូងនេះមិនត្រឹមតែកែ PDF ទេ លោកអ្នកក៏អាចធ្វើការបន្ថែមអក្សរនៅលើឯកសារប្រភេទ PDF បានផងដែរ។

ទាយយក|Download Here

១០ យ៉ាង Upgrade ទៅ Windows 10

0 comments
មូលហេតុ ១០ យ៉ាងដែលអ្នកគួរតែ Upgrade ទៅកាន់ Windows 10|
1
ទីបំផុត Windows 10 ត្រូវ​បាន​ចេញជាផ្លូវការហើយ ដែលជាជម្រើសថ្មីមួយទៀតសម្រាប់អ្នកប្រើប្រាស់ កុំព្យូទ័រ ទូទៅ អាចជ្រើសរើសដើម្បីតម្លើងក្នុងកុំព្យូទ័ររបស់គេ។ Windows 10 រំលេចចេញនូវការរចនារូបរាងដែល ផ្ដល់ ភាពងាយស្រួលទាំងសម្រាប់ អ្នកដែលប្រើប្រាស់ Windows 7 និង Windows 8 ទៀតផង។ សម្រាប់ការ Upgrade ទៅកាន់ Windows 10 មិនត្រឹមតែបន្ថែមមុខងារយ៉ាងច្រើនទៅកាន់កុំព្យូទ័ររបស់អ្នក ប៉ុណ្ណោះទេ ជាពិសេស​គឺ អ្នកអាច​ធ្វើការ Upgrade បាន​ដោយឥតគិតថ្លៃ បើសិនជាកុំព្យូទ័ររបស់​អ្នកទាំងអស់គ្នាមាន License និងតំណើរការដោយ Windows 7 និង Windows 8។
បើអ្នកទាំងអស់គ្នាមិនទាន់ច្បាស់ក្នុងចិត្តថា​ តើការ Upgrade ទៅកាន់ Windows 10 មានអត្ថប្រយោជន៍អ្វីខ្លះ សម្រាប់ អ្នក ខាងក្រោមនេះគឺជា អត្ថប្រយោជន៍ទាំង ១០ សំខាន់ៗដែលអ្នកគួរតែធ្វើការ Upgrade៖
១. ល្បឿន
1
ចាប់តាំងពី Windows 8/8.1 មក ល្បឿននៅពេលបើកកុំព្យូទ័រ boot គឺលឿនជាង ជំនាន់ Windows ចាស់ៗទាំងអស់។ ហើយសម្រាប់ Windows 10 បានពង្រឹងបន្ថែមទៅល្បឿននៅពេល boot បាន ប្រសើរជាមុន និងបានបន្ថែមនូវ DirectX 12 ដែលបង្កើនល្បឿន និងគុណភាពនៃ 3D Games បាន យ៉ាងប្រសើរជាងមុនផងដែរ។២. ការរចនាថ្មីរបស់ Start Menu
https://youtu.be/V9iCiYejgA4
មានមតិរិះគន់ជាច្រើននៅពេលមានការផ្លាស់ប្ដូរនូវ Start Menu មកជា Start Screen ថ្មីនៅក្នុងជំនាន់ Windows 8 ដែល Start Menu គឺជាមុខងារមួយដែលអ្នកប្រើប្រាស់ Windows និយមប្រើប្រាស់តាំងពី Windows 95 មកម្ល៉េះ។ សម្រាប់ Windows 10 ក្រុមហ៊ុន Microsoft បាន​ធ្វើការច្របាច់បញ្ចូលគ្នារវាង Start Menu និង Start Screen ដើម្បីអាចបំពេញចំណង់ចំណូលចិត្តអ្នកប្រើប្រាស់ទាំងអស់ មិនតែប៉ុណ្ណោះគេ​ក៏បានបន្ថែមមុខងារ និងជាច្រើនទៀតសម្រាប់ Start Menu ថ្មីផងដែរ ដែលផ្ដល់ភាពងាយសម្រាប់ទាំងអ្នកប្រើ Mouse/Keyboard និងអ្នកប្រើ Touch Screen ផងដែរ។
៣. ជំនួយការ Cortana
https://youtu.be/TYG-FSZE2WE
វាពិតជាប្រសើរដែលយើងអាចធ្វើការនិយាយជាមួយនឹងបច្ចេកវិទ្យាបាន។ អ្នកប្រហែលជាធ្លាប់លឺហើយពី Siri របស់ Apple និង Google Now ដែលបច្ចេកវិទ្យា​ទាំង​​នេះ​ផ្ដល់​ភាព​ងាយស្រួល ក្នុងការទំនាក់ទំនងជាមួយ នឹងបច្ចេកវិទ្យា ដោយមិនចាំបាន​ប្រើដៃនោះទេ។ សម្រាប់ Windows ឥឡូវនេះអ្នកអាច​បញ្ជាកុំព្យូទ័ររបស់ អ្នកតាមការ​និយាយ​ទៅកាន់កុំព្យូទ័រ​ របស់អ្នក ឧទាហរណ៍ដូចជាការបញ្ជាឲ្យចាក់ចម្រៀង អ្នកគ្រាន់តែ​និយាយ​ថា​ “Hey Cortana, Play Music”។
៤. កម្មវិធីដែលតំណើរការបានគ្រប់ឧបករណ៍ទាំងអស់ (Universal Apps)
1បើត្រឡប់មកមើល Windows 7 វិញ គឺមិនមាន Store កម្មវិធី ដែលអ្នកអាចទាញយក កម្មវិធីដោយងាយ ស្រួលនោះទេ។ នៅក្នុង Windows 10 បានផ្ដល់នូវ Store ដែលអ្នកអាចស្វែងរកកម្មវិធី ចម្រៀង ភាព យន្តគ្រប់ប្រភេទ ហើយសម្រាប់កម្មវិធីគឺអនុញ្ញាតឲ្យអ្នកអាចតំណើរការបានទាំងលក្ខណៈ Windows mode និងពេញអេក្រង់ផងដែរ។ លើសពីនេះ Windows 10 ក៏មានភ្ជាប់មកជាមួយនឹងកម្មវិធីល្អជាច្រើនដូចជា Photos, Videos, Music, Maps, People, Mail, និង Calendar។ កម្មវិធីទាំងអស់គឺតំណើរការបាន យ៉ាងល្អទាំង សម្រាប់ កុំព្យូទ័រប្រើ Mouse/Keyboard ទូទៅ ក៏ដូចជាប្រភេទ Touch Screen ផងដែរ។៥. មុខងារ Touch Screen
1បើទោះជាមុខងារ Touch Screen ត្រូវបាន​ដាក់ប្រើប្រាស់ជាច្រើនឆ្នាំមកហើយក៏ដោយ តែបើសិនជាអ្នកទាំង អស់កំពុងតែប្រើប្រាស់ Windows 7 នោះ គឺអ្នកនឹងយល់ថាមុខងារ Touch Screen មិនបានផ្ដល់ ប្រយោជន៍ អ្នកច្រើននោះទេ។ ក្នុង Windows 10 បានធ្វើឲ្យមុខងារ Touch Screen កាន់តែមានប្រសិទ្ធិភាព លើសពី Windows 8 ដោយបានបន្ថែមនូវមុខងារ Continuum និងមុខងារផ្សេងៗជាច្រើនទៀត។
៦. មុខងារ Action Center1ទូរស័ព្ទរបស់អ្នកអាចលោតចេញនូវការផ្ដល់ដំណឹង notifications សម្រាប់ ការផ្ញើសារ, កំណែប្រែប្រព័ន្ធថ្មីៗ, ព័ត៌មានថ្មីៗ វាក៏អាចផងដែរសម្រាប់កុំព្យូទ័ររបស់អ្នក នៅក្នុង Windows 10។ វាស្រដៀងគ្នាទៅនឹង Notification Center របស់ Mac OS X អញ្ចឹងដែរ គឺ Action Center ផ្ដល់នូវ​សារពី អ៊ីមែល, ការជូនដំណឹងរបស់ប្រព័ន្ធ (ដូចជាការតំឡើងកំណែប្រព័ន្ធថ្មីៗ), ឬពីកម្មវិធី ដូចជាការព្រមានពីអាកាសធាតុ ឬការរំលឹកពីថ្ងៃកំណើតជាដើម។៧. កម្មវិធីរុករកអ៊ីនធឺណេតប្រសើរជាងមុន
https://youtu.be/TvfkthLLEoE
កម្មវិធីអ៊ីនធឺណេតថ្មី ឈ្មោះថា Microsoft Edge (ពីមុនឈ្មោះថា Project Spartan) ក្លាយជាកម្មវិធីរុករកអ៊ីនធឺណេតដើម នៅក្នុង Windows 10។ វាបានផ្ដល់នូវលក្ខណៈសម្បត្តិថ្មីៗជាច្រើនដូចជា មុខងារ Reading Mode មុខងារ កត់ត្រាលើវេបសាយ និងមុខងារផ្សេងៗជាច្រើនទៀត។
៨. ផ្ដល់សុវត្ថិភាពបានប្រសើរជាងមុន
1Windows 10 បានរក្សានូវមុខងារ Secure Boot ពី Windows 8 និង​បាន​ពង្រឹងវាឲ្យកាន់តែប្រសើរជាមុន។ បន្ថែមពីលើនេះ Windows 10 ក៏បាន​បន្ថែមមុខងារសុវត្ថិភាពផ្សេងៗទៀតដូចជា Device Guard, Microsoft Passport និង Windows Hello ផងដែរ។
៩. ទម្រង់គ្រប់គ្រង Virtual Desktop
https://youtu.be/eyu5I2Vg8y8
អស់រយៈពេលជាច្រើនឆ្នាំមកហើយ ដែលអ្នកប្រើប្រាស់ Mac ពេញចិត្តនូវសមត្ថភាពដ៏មានប្រយោជន៍ ក្នុងការផ្លាស់ប្ដូរផ្ទាំងការងារនិមិត្ត (Virtual Desktop)។ ទីបំផុត Windows 10 បាននាំយកនូវលទ្ធភាព នេះមកកាន់ប្រព័ន្ធតំណើរ Windows 10 សម្រាប់ Desktop ហើយ។ អ្នកអាចប្រើ Keyboard Shortcuts ដើម្បីធ្វើឲ្យមុខងារនេះកាន់តែមានប្រយោន៍ និងលឿនថែមទៀត ។

របៀប​ដំឡើង Windows 10

0 comments
មិត្តអ្នកអាន មួយចំនួនប្រហែល ជាគិតថា ការដំឡើង Windows ជំនាន់នីមួយៗ តែងមានការ ដំឡើងខុសៗគ្នា។ តែការពិតទៅ វាមានរបៀប ដំឡើងខុសគ្នា តិចបំផុត ហើយការដំឡើង របស់ Windows គ្រប់ជំនាន់ សឹងតែដូចគ្នា ទាំងស្រុង ដោយខុសគ្នា ត្រង់ចំនុចតិចតួច និងរចនាបថក្រាហ្វិក របស់វា តែប៉ុណ្ណោះ។ អ្នកត្រូវដឹងឲ្យ ច្បាស់ពី Windows ដែលអ្នកយក ទៅដំឡើង ដោយសារមាន Windows ខ្លះមានការ crack រួច ឬខ្លះត្រូវការ Product key ភ្លាម និងខ្លះទៀត អាចត្រូវ skip កន្លែងវាយលេខ Product key បាន តែត្រូវ Activate តាមក្រោយ ទើប ប្រើប្រាស់បាន។
ក្នុងឱកាសនេះដែរ យើងនឹងណែនាំ មិត្តអ្នកអាន ពីរបៀបដំឡើង Windows 10 វិញម្តង ហើយមិត្ត អ្នកអាន អាចធ្វើ ការ អនុវត្តតាម របៀបនេះ នៅពេលដំឡើង Windows ជំនាន់ផ្សេងៗក៏ បានដែរ។ដើម្បី ជ្រាប កាន់តែច្បាស់ សូមអានការណែនាំខាងក្រោម៖
  • អ្នកត្រូវដោនឡូដ Windows 10 ដែលជាប្រភេទ file ISO នៅលើ អ៊ីនធើណេត រួចត្រូវមាន កម្មវិធីមួយឈ្មោះ ImgBurn សំរាប់ធ្វើការ Burn file ISO នេះទៅក្នុង Flash Drive ដើម្បីប្រើសំរាប់​ boot នៅលើកុំព្យូទ័រ នៅពេលដំឡើង
    • ចុចទីនេះ សម្រាប់ដោនឡូដ Windows 10 64 bit (ប្រើប្រាស់ Utorrent ក្នុងការទាញយក)
    • ចុចទីនេះ សម្រាប់ដោនឡូដ Windows 10 32 bit (ប្រើប្រាស់ Utorrent ក្នុងការទាញយក)
  • បន្ទាប់ពីធ្វើការ burn ដាក់ Flash Drive រួច អ្នកអាចយក Flash នោះដោតចូល កុំព្យូទ័រដែល ចង់ដំឡើងនោះ រួចចុចលើ ប៊ូតុង F12 (កុំព្យូទ័រខ្លះអាច ចុចលើ ប៊ូតុងផ្សេង) ដើម្បីឲ្យកុំព្យូទ័រ ធ្វើការ boot បន្ទាប់មក ចាំមួយភ្លែត វានឹងចេញ រូបដូច ខាងក្រោមនេះ
  • ពេលដែលបានឃើញរូបបែបនេះ អ្នកត្រូវចុច Next
1- រួចចុច Install
1- ពេលនោះវានឹងទាមទារឲ្យ អ្នកបំពេញ លេខសម្ងាត់ Product key នៅលើ Windows ខ្លះ ហើយអ្នក ក៏អាច Skip វាបានដែរ នឹងចាំធ្វើការ Activate តាមក្រោយ ក៏បាន ឬខ្លះទៀត មិនមាន Product key ក៏មានដែរ ដោយសារគេបាន crack រួចហើយ
– អ្នកត្រូវចុចលើជម្រើស Custom: Install Windows Only (advanced)
1- បន្ទាប់ចុចលើ Drive C បន្ទាប់ចុច លើពាក្យ Format បន្ទាប់អ្នក អាចចុច Next បាន
1- រង់ចាំឲ្យវាដំនើរការបានដល់ 100 ភាគរយ វានឹង ចាប់ផ្តើម Restart ម៉ាស៊ីនដោយស្វ័យប្រវត្តិ
1- ចាំមួយភ្លែត បន្ទាប់វានឹងចេញផ្ទាំង សំរាប់ឲ្យអ្នក ធ្វើការ កែតម្រូវ និងបំពេញបែបបទ មុនពេលប្រើ តែអ្នកត្រូវ ចុចពាក្យ Use express settings
1- បន្ទាប់អ្នកត្រូវ skip កន្លែងវាយ Microsoft account និងកន្លែងភ្ជាប់ wifi រួចអ្នកបំពេញអ្វី ផ្សេងៗបាន
1- បន្ទាប់ពីរួចរាល់ត្រឹមត្រូវ វានឹងចេញ បែបនេះ ដូចនេះអ្នក ត្រូវរង់ចាំបន្តិច
1- បន្ទាប់ពីដំនើរការហើយ អ្នកអាចចុច ប្រើប្រាស់ បានធម្មតា
1បើសិនជា Windows 10 ដែលអ្នកបាន ដំឡើងហើយ មិនទាន់បាន Activate អ្នកអាច ធ្វើតាមវិធី ខាងក្រោម៖​
  • ចុចចូល Command Prompt និង Run as Administrator បន្ទាប់វាយ ឃ្លាណាមួយ សំរាប់ Windows 10 ដែលអ្នក បានដំឡើង
+ For Windows 10 build 10240 Home
  slmgr /ipk TX9XD-98N7V-6WMQ6-BX7FG-H8Q99
+ For Windows 10 build 10240 Professional
slmgr /ipk W269N-WFGWX-YVC9B-4J6C9-T83GX
+ For Windows 10 build 10240 Enterprise
  slmgr /ipk NPPR9-FWDCX-D2C8J-H872K-2YT43
  • រួចចុច Enter បន្ទាប់ចាំទាល់តែវាចេញ ប្រអប់ប្រាប់ថា ជោគជ័យ បន្ទាប់បន្ត វាយឃ្លា slmgr /skms kms.xspace.in ចុច Enter ទៀត
  • ចាំទាល់ចេញប្រអប់មួយបង្ហាញ ថាជោគជ័យ បន្តវាយឃ្លា slmgr /ato បន្ទាប់ចុច Enter ពេលនោះវានឹង បញ្ចេញប្រអប់មួយ បង្ហាញថា ជោគជ័យ ទើបបាន សំរេច។
1ដើម្បីជ្រាបកាន់តែច្បាស់ អ្នកអាចទស្សនាវីដេអូខាងក្រោម៖
https://youtu.be/p1gaONAOBjE

Friday, October 9, 2015

MICROSOFT Office PRO Plus 2016

0 comments


MICROSOFT Office PRO Plus 2016 v16.0.4266.1003 RTM + Activator [TechTools]
Microsoft Office 2016 is the complete, cross-platform, cross-device solution for the modern workplace, with smart tools for individuals, teams, and businesses. It can open your applications, documents anywhere, across multiple devices. Get the installed applications you know and trust - Word, Excel, PowerPoint, OneNote, Outlook, Publisher, Access. Always have the latest, full installed versions of Word, Excel, PowerPoint, OneNote, Outlook, Publisher, and Access and capture your ideas however you work best - using a keyboard, pen, or touchscreen. Microsoft Office 2016 will offer new security, compliance, and deployment features, giving organizations more control over sensitive data and IT more flexibility in deployment and management.

Microsoft expanded the Office footprint to iPad and Android tablets. Upgraded Office experiences on the Mac, the iPhone and on the web. Also have been added new apps to the Office family with Sway and Office Lens. All designed to keep your work moving, everywhere. While you\'ve seen us focus on tuning Office for different platforms over the last year, make no mistake, Office on Windows desktop is central to our strategy.

Microsoft Office 2016 suite includes applications such as Word, Excel, PowerPoint, and Outlook. Office 2007, Office 2010, Office 365, or Office 2013 users can open documents created without any additional action. Customers using earlier versions of Office may need to download and install a compatibility pack.

New in Microsoft Office 2016:

Your documents, anywhere - Across the Office 2016 applications, it\'s easier to use the power of feature-rich applications to create, open, edit and save files in the cloud from your desktop, so you can access them from anywhere and on any device. In addition, new modern attachments in Outlook make it easy to attach files from OneDrive and automatically configure permission for the recipients - without leaving Outlook. All making it easier to share and collaborate on your work with others.

Collaboration - Real-time co-authoring is available in the Office Online apps today and we\'re bringing that experience to the Windows Desktop applications, starting with Word. When you and your team are working in Word 2016 and/or Office online, you\'ll be able to see where other editors are working and what they are writing - all in real-time.

Smart Applications - Applications will learn as you work, taking advantage of subtle cues and clues to help you stay on task and get more out of Office. Tell Me, a new search tool available in Word, PowerPoint, and Excel, serves up the commands you need by simply typing what you want to do. Clutter - a new Exchange feature that lights up in Outlook - uses machine learning to analyze your email patterns and de-clutter your inbox by moving lower priority messages out of your way and into a new Clutter folder. And Insights, powered by Bing, finds you contextual information from the web within the reading experience.

Data analysis made faster and easier - New analysis capabilities are built into Excel, so you can pull, map, analyze and visualize your data faster and easier than ever.

• One-click forecasting. Create forecasts on your data series with one click to future trends.
• Intuitive data connecting and shaping capabilities. With integrated Power Query, use Excel as your personal analysis workspace by connecting to and viewing all the data around you. Take advantage of a broad range of data sources, including tables from websites, corporate data like SAP Business Objects, unstructured sources like Hadoop, and services like Salesforce. After bringing all your data together in one place, quickly shape and combine to fit your unique business needs and get to analysis in seconds
• Easy data modeling and powerful analysis. With improved Power Pivot features as part of Excel, map different data sets with drag-and-drop ease to build data models to give you the bigger picture of your business. Take advantage of intuitive analysis functions, automatic time grouping and other features that enhance your PivotTable and PivotChart analysis experience. Now with the ability to calculate 100s of millions of rows of data, perform deeper analysis with high speed.
• Publish to Microsoft Power BI Preview. Effortlessly publish and share your Excel workbooks to users of Power BI.
• New modern charts and graphs, including TreeMap, Sunburst, Waterfall, Box and Whisker and Histogram and Pareto in Excel help you to present your data in fresh ways.
Download with Torrent|ទាញយកពីតំណភ្ជាប់

Monday, October 5, 2015

KMSpico 10.1.6 Final+Portable (Office and Windows 10 activator)

1 comments

KMSpico 10.1.6 Final+Portable (Office and Windows 10 activator)


KMSpico 10.1.6 FINAL + Portable (Office and Windows 10 Activator) [TechTools]
KMSpico - is the ideal tool to activate the final version of Windows 7/8/8.1 and Office 2010/2013. Activator does not require user intervention, the entire activation process takes place in the background, just run the activator and a couple of minutes to check the activation status of Windows and/or Office.

Important: If you like MS Windows and MS Office please buy legal and original this program help to test this products, but recommend you buy legal from creators (M$ Corp). I did this for fun, and now I am done with this. Working in W8 and Office 2013 fresh install and VOLUMEN LICENSE editions.

Recommendations Optional:
- Make exceptions to Directory %ProgramFiles%\\KMSpico\\*.exe in Antivirus or Defender.

Requirements:
.NET 4.0 or Windows 8/2012.

Activate:
 Windows Vista Bussines/Enterprise
 Windows 7 Professional/Enterprise
 Windows 8
 Windows 8.1
 Office 2010/2013
 Windows Server 2008/2008R2
 Windows Server 2012/2012R2
 Windows Server Technical Preview Build 9841/9860 All
 Windows 10 Technical Preview Build 9841/9860/9888 All


Wednesday, August 26, 2015

My computer suddenly showed blurred colored pattern on the screen

0 comments
My Computer was hanging from last few days. Anyhow it was working until yesterday night. Suddenly, today morning when I powered on my computer, the screen colored blur pattern. What the hell happened I didn’t understand for some time? I understand this is really frustrating.
blurscreen2

What steps I followed to remove the troubleshooting?

I opened the cover for the cabinet and the first thing I tested was whether my screen was okay or there is some problem in my screen. I connected my desktop to another screen but the same problem was shown in the screen. This confirmed me that the screen was fine.
If you have a laptop then you can connect another screen to the laptop outlet which you can find on the side of the screen.
screenconnector
The next thing I tested weather was my Memory. I had two RAM of 2 GB each on the memory slots. I removed one of the memory from the slots and restarted the computer again. Be sure to remove and insert the RAM correctly into the module correctly. If you have correctly inserted the RAM properly into the slot then you will have hear a beep sound once. Now this time it was working perfectly fine. This confirmed that there was memory problem.
memoryslot
If this hadn’t solved my problem the third thing I would have done was to doubt the onscreen video card. In that case you can buy an external Video card and install and try it again. This will surely solve the problem.

How to automatically go to the desktop mode instead of start screen in Windows 8.1

0 comments
Start screen is the new feature which was added in Windows 8. It is the heart of Windows 8 and its successor versions. In the start screen we can find important applications, pictures, news and many other application in the form of tiles. You can also customize the start screen as you want. Now many of us may not like this feature as we are used to desktop mode as in Windows 7 and the other previous version of windows. So, windows 8.1 has included the feature with which you can automatically go to the desktop mode instead of start screen in Windows 8.1
windows8.1screenIf you want to automatically go to the desktop mode instead of start screen in Windows 8.1 then you can do now in this version of Windows.
Right click on “Taskbar” and click on “Properties“.
windows8taskbarYou will see the following dialog box. Now click on “Navigation” tab.
window8taskbarNow put a tick mark in the check box in front of “When I sign in or close all apps on-screen, go to the desktop instead of start“.
Now click on “Apply” and “OK“.

How to hide a hard drive partition without putting any password

0 comments
Do you have any secret files and folders in a separate partition of a hard drive and do you want to hide it from others?
If you want to hide a hard drive partition then you can do with Windows in-built tool called “Disk Management“.
You can access to “Disk Management” from “Control Panel” – ” Administrative Tools“- “Computer Management“.
Click on “Disk Management“. 
diskmanagementfinal
Now right-click on the partition which you want to hide.
hidepartition
Click on “Change Drive Letter and Paths” and you will get the following window.
hidepartition2
Now select the drive which you want to hide and click on “Remove” button.
You will get a warning message that some of the programs which are installed on the partition may not function properly if you hide it. Example if you have installed any Microsoft Office program then it may not function. So, the drive which you want to hide should only have files and folders, not the program installed.
hidepartition3
Click on “Yes” button and the drive will be hidden now.
If you double-click on “My Computer” icon on the desktop to check the partition, you won’t see it.
hidepartition4
This is how you can hide a partition.
Now if you want to make the drive visible again then follow the below steps.
Go to “Disk Management” again.
Right click on the Drive which is hidden.
Click on “Change Drive Letter and Paths“.
showpartition
Click on “Add” button.
showparttition2
Now on the right side of the dialog box you can see a drop down menu where you can click to assign a letter to the hidden drive.
After assigning the letter to the drive, Click on “OK” button. Now you will be able to see the hidden partition as as shown in the picture below.
showpartition4
This is how you hide a hard drive partition and show it without using any password.

Enable Remote desktop in Windows 7

0 comments
Before you start Remote desktop you need to make sure that Remote desktop in not blocked by Windows Firewall.
How to allow Remote desktop through Windows Firewall?
Click on “Start” button.
Type “Windows Firewall” in the search box.
remote desktop

Click on “Allow a program through Windows Firewall“.
Click on “Change settings“.
remote desktopClick on “Allow another program” as shown in the picture below.
remote desktop
Click on “Browse” button.
remote desktop
Now Go to”C:\Windows\System32\mstsc” or the drive where your Windows is installed.
remote desktop
Click on “Add” button. You will see “Remote Desktop Connection” on the list. Click on the check-box before “Home/Work(Private)” or “Public” as per needed.
remote desktop

Click on “OK” button.
Now you have to enable Remote desktop through Windows Firewall.
You need to make sure that you have enabled Remote Desktop on the PC to which you want to connect.
Right click on “My Computer” icon on the desktop and click on “Properties“.
Click on “Remote settings“.
remote desktop
Select the check-box “Allow Remote Assistance connections to this computer“.
Under “Remote Desktop“, select “Allow connections only from computers running Remote Desktop with Network Level Authentication” for more secure connection.”

remote desktop
Click on “Apply” and then on “OK“.
Finally the last step is to connect to the desktop Remotely.
Click on “Start” and then type “Remote Desktop connection“.
remote desktop
Now click on “Remote desktop connection” on the top. Now enter the name of the computer to which you want to connect. In my case the computer I want to connect is “Kundandamak“.
remote desktop
Now click on “Connect” button.
remote desktop
You need to enter the password for the username of the computer to which you want to connect. Once you get the password enter it and then click on “OK” button.
Now you will be connected to the Remote computer.
remote desktop
The computer on the other side will be automatically locked.
This is how you can setup Remote Desktop connection and connect to the remote computer.

 
© 2015 VideoTraining | Designed by Khmerhappyboy | www.videocomputertraining.blogspot.com Tel: 093 359 214